Saturday 29 December 2012

Flames of War basing tutorial


A lot of people said the bases were looking very nice so I'm doing another step by step with pictures.


I start by painting the miniatures as best I can. This is only my third set in quite some time so I'm not that good at it yet. I've primered the base black along with the minis at first and used masking liquid to keep the holes clear of paint so that the plastic glue can work it's magic. After it's settled I use epoxy putty to close the gaps and sculpt some rocks and a small bulge to mix things up. I then masked the edges because I want them to stay black.


I paint the ground brown and the rocks gray and add highlights with drybrushing.


I glue some intermediate rocks.

Should have glued the tufts at this point.


Making small random patches of glue I add the medium brown ballast and fine gray ballast. I bet all sorts of other particulates will also be fine. The idea is to get some randomness and different sizes of small ground detritus. 


I add some particles where I think they're needed.

I neglected to take a picture of it again but I wash the whole thing with a dark shade to give it some unity.


I dab some more random patches of glue and sprinkle flock.


Again, with static grass.


Glue some clump foliage.


I glue some tufts. 

IMPORTANT NOTE: I now think that the tufts should be glued after painting the dirt and before starting the flocking because their bottoms are flat and with a bunch of stuff in the way they may stick out above small rocks and look out of place. 

GLUE TUFTS AT BEGINNING! (after painting, before flocking).

 And there we go.


That's a lovely tiny German Infantryman you've got in your pocket.

Things what I did:

Three of Five-

Shaved the hand and placed patches. Shaved off the boots and re-did them with limited success. Added a cargo pocket on the left pant leg. Fixed the left arm in place for further sculpting. Shaved down the fore grip and carrying handle.

Four of Five-

Base for helmet and one ammo pouch.

Flames of War- Open Fire!

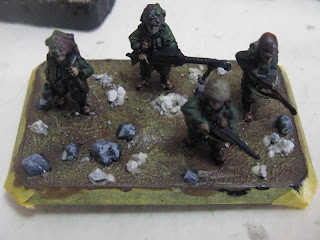
Painted up an american MG team. Attached to base. Used left over putty to make rocks. I'll do another step by step on the basing of the team when I finish it. Quite a few people appreciated how the last ones turned out. I hope this one is as good.


Thursday 27 December 2012

Flames Of War base landscaping - step by step

I've put together this little step by step of doing a base on a FOW unit. I love doing them!

I'm not exactly experienced so take it with a grain of salt. I'm sure some things could be improved/changed. For instance I think next time I'll add the shrubbery at the end rather than the middle.


Supplies that I've accumulated.

A. Generic flock.
B. Woodland Scenics fine ballast grey.
C. Small rocks that I received as a bonus on another order.
D. Silflor desert tufts
E. Silflor spring flowers
F. Woodland Scenics ballast brown medium
G. Woodland Scenics Clump Foliage olive green
H. Generic clump foliage dark green
I. Woodland Scenics static grass dark green.


In my defense I'm obviously mental or something. 


1. Painted figures, glued to base, used putty to close gaps and make rocks.
2. Used some grit texture paint to add texture. A tad late but I added masking tape.
3 + 4 painted black and then brown for the dirt and grey for the rocks.


5. Lighter tone drybrushing all around.
6. Glued plants with cyanoacrylate. In retrospect this should probably be held off to the end.

7. Using Elmer's glue I apply the fine ballast and wait for it to dry. Then I do the same with the brown medium ballast.

Afterwards I applied a dark wash and then dabbed some more glue again.

8. Flock.


9. Glue for static grass
10. added the grass, a couple of small desert tufts and a bit of clump foliage.
11. Done!


Sleeves? Where we're going we won't need "sleeves".

Famous quote. It's legit.

1 to 72 scale German soldier does and will need sleeves. So I Green Stuff sculpted one for him and a hand to boot! 

Speaking of boots, I do kinda want to do something about them. 


Oh hai!


There's more words down here too.
So I'm thinking about something and want to get some more opinions. I want to try and crowdfund a small scale project (pun intended, regrettably) and I'm thinking about what would be most awesome.
Enter poll.
The basic gist is some small 5-10 unit sized pack. The options I have for the poll are:


  • World War 2 figures 
  • Historical IDF 
  • Modern IDF
  • Fantasy figures of a theme that combines Cold War aesthetic with stock fantasy types, I call this style War Punk. 
  • Near Future Special Forces and opposing Aliens.
  • Sci Fi infantry orbital drop troops


I'm adding a second poll to see what scales I should do.

  • 1:35- good for large models, role playing games and pure "hobby" pursuits.
  • 1:64/1:54- 28mm scale - excellent for squad tactics, up to platoon.
  • 1:72- 20mm scale, also good for models, good for squad up to company or two size games.
  • 1:100- 15mm scale- very nice for larger forces; platoon to battalion.


Both polls will run until the 15th at midnight. I hope they can give me an idea of where to steer my thoughts in the matter.

You can write your ideas, if you have any for the theme and scale. I may add them to the polls. Please direct your miniature gaming friends to the poll so I can get as complete a picture as possible if any.

There you go. Cast your votes!


Tuesday 25 December 2012

You know what I love? Tiny landscaping. That's what.

Don't forget to follow my Twitter account to get updates on when I update the blog from the tweets!

Incredibly swamped with illustration work. I can somehow work more and more and accomplish less and less it seems. Hrmpf. 

I could bring myself to mix a minuscule amount of Green Stuff and glue the G36 to the infantryman's hand and fix the arms in their position. 


What's this then?

I picked up via internet trade the Open Fire! box set by Battlefront. I've had my eye on Flames of War for a while mainly because of how well supported and presented it is by Battlefront. I think box sets of two complete forces are a fantastic way to have people buy into your game. It's certainly something I'd like to achieve some distant day. The new Open Fire! is so full of stuff I couldn't resist  It's really an incredible value for money in my opinion. 

I've been accruing scenery stuff and paints and decided to go ahead and paint a unit. I don't have all the exact accurate paints for everything but I did my best mixing up the paints I needed with what I have. These are the first miniatures I've painted in 11 years or so, I think. It's what you might call "table top" level of work. 

On the other hand, landscaping the base was really really cool and fun. I'm looking forward to doing more base work. Send your ideas on things one might find on a scenic base. I still want to have a general "everywhere" sort of look so nothing too out of the ordinary. 

My conclusion is that 15mm or 1:100 is also a really awesome scale. Especially with the enhanced presentation options you get with the "big" bases. 

I'd love to do some kind of Flames of War, Israeli Arab wars. Wouldn't that be cool? 

I'll update my progress as I make it. 


Sunday 23 December 2012

Ready? Sculpt!

It feels really good to get some sculpting done again. Here's today's session. Smock, IDZ vest, knee-pads and pockets. 
Red dot sight placed on G36. Soon I can place the rifle on figure Three of Five on our modern Bundeswehr pack! 

I'm really bursting with ideas and things I want to do but I'm also half drowning with work (so happy) and I'll just have to advance at regular human pace. I might as well write down some ideas: a military wizard in 28mm, IDF tank crew in 1:35, historical IDF & Arabs in 1:100, science fiction military in 28mm or 1:72, power armor/tank, combat drones- medium future... uh, that's it for now. If you have any ideas write them in the comments. What would you like to see?


Friday 21 December 2012

Back in action!

My dear readers,
Hi! I'm back home and ready to go. I'll post updates on the sculpts as soon as I get some work in. I'm getting settled in a little but here are some photos from my trip in the meantime.
Not many people know we have cloaking ability

My favoritest machine

My gear lying around


Thursday 13 December 2012

A special message

Hello dear followers and readers.

I'm sorry I could not update more rapidly. I've been very busy with doing illustrations the past week and had no time for sculpting. I've been working on games, but I can't show what I've made for them yet. Gotta respect my client's wishes, after all.

I wanted to let you know I'm going on a camping trip and won't be here to update for the next week or so. I'll post a blog once I return and I bet by then I will be aching to get more progress on our projects. I would have done some progress now if I wasn't so dead tired and had to get up really early.

Since there isn't much sculpture here I wanted to show you a more personal side. Here is a photo of me and my son.


Here are some illustrations I've made by request.

A humorous illustration of Jesus and his dinosaur.
 A character for a policeman's website.
 A fellow's portrait for his personal use in avatars and the like.
 A sign for a farm,
 Following are avatars that folks have requested and are using. Don't use them for your own, they are personal to the folks who requested them. Thanks.

Some of these have a white outline because due to size constraints they're optimized for working on a nearly white background. If you want to see what that's like right click>open image in new tab/window.